Yesterday’s Apple World Wide Developer Conference keynote was a long one. It came in at just under two and half hours. This is the longest keynote that they have done, end so it was completely full of announcements. A list of items covered include software, and hardware, including some sneak peeks at hardware coming later. There was so much in this keynote, it is hard to choose where to begin. Let us start with hardware.
iPad Pro


One of the things that Apple announced at this keynote is new iPad Pros. The new iPad Pros have a slew of new features. Both of the iPad Pros now have feature parity, meaning that they have the same hardware inside the case.
- ProMotion technology
- P3 Wide Color Gamut
- True Tone Display
- A10X Fusion Chip
- 12-megapixel camera
- ƒ/1.8 aperture
The physical dimensions of the iPad Pros have changed, at least for the 9.7-inch model. That model is gone. It has been replaced with the new 10.5-inch iPad Pro, yet it is almost the same physical size. This is possible because there is now 40% less bezel on the sides. The new 10.5-inch iPad Pro is only 0.3 inches longer and 0.2 inches wider than the 9.7-inch model. The size difference also means that the weight of the 10.5-inch iPad Pro is a bit more over the 9.7-inch model. In fact, it is a whole 32 grams, or 0.07 pounds more.
If one is going from the 9.7-inch iPad pro to the 10.5-inch iPad Pro you will see a more modest set of changes one. However, the 12.9-inch iPad Pro is seeing a bunch of new features. Again, these are all available on the 10.5-inch. The new features of the 12.9-inch include:
- Digital zoom up to 5x
- Optical image stabilization
- Six‑element lens
- Quad-LED True Tone flash
- Panorama (up to 63 megapixels)
- ProMotion technology
- Wide color display (P3)
- True Tone display
As mentioned, these were all available on the 9.7-inch previously, however having them on the 12.9-inch iPad Pro will be a nice change for those 12.9-inch iPad Pro owners who do upgrade. In fact, the 12.9-inch iPad Pro is now lighter by 36 grams, or 0.08 pounds.
The FaceTime camera has also been upgraded in both models. It is now a 7 megapixel camera with a ƒ/2.2 aperture, and 1080p recording. The FaceTime camera includes Wide Color capture as well. The FaceTime camera changes will work not only for FaceTime but also for selfies.
There is one last thing to note. The 10.5-inch iPad Pro is the only one that comes in Rose Gold. The 12.9-inch iPad Pro does not. The 10.5-inch model starts at $649, while the 12.9-inch model starts at $799. You can choose among three different storage sizes, 64GB, 256GB, and 512GB. This is double the previous models. There are also cellular models and these cost $130 more. The new iPad Pros are able to be ordered today, and they ship next week.
Macs
The quick summary is that everything got updated, well except the Mac mini, and the MacBook Air. The iMac, MacBook and MacBook Pros have all gotten an upgrade to the latest Intel Series of chips, codenamed Kaby Lake. The 13-inch MacBook now has the Intel Iris Plus 640 Graphics chip, where as the 13-inch with Touch Bar has the Intel Iris Plus Graphics 650.
The 15-inch MacBook Pro with Touch Bar now includes an AMD Radeon 555 with 2GB of Video RAM, or Radeon 560 with 4GB of Video RAM. The 13-inch MacBook Pro non-touchbar model is now starting at $1299.
The 12-inch MacBook has also received a slight upgrade as well. It also has the 7th Generation Intel chips. It now has a 1.2 GHz process as its base which includes Intel HD 615 Graphics. Along side this it has Bluetooth 4.2 support.
If you are still in the market for a MacBook Air, they are still around and have recieved a very minor procssor speed increase, but that is the only change for the MacBook Air.
The MacBooks were modest upgrades, unlike the iMacs. These received a more substantial upgrade.
iMacs

The entire Retina iMac line received upgrades to the latest Intel chips, Kaby Lake. The most notable change is in the 27-inch Screen. It now supports the Wide Color Gamut (P3), which brings it to parity with the iPads.
The second biggest change is that the iMac line now supports USB-C, and Thunderbolt 3, with the two USB-C ports available on all models. This is the first time that USB-C has been available on a desktop Mac. Alongside, there is also Bluetooth 4.2 support. One of the most noticeable changes will be in graphics. For all Retina models, Apple is now including AMD Radeon Pro graphics. For the 21.5-inch model this is the 555 with 2GB of RAM or the 560 with 4GB of RAM. The 27-inch models get the Radeon Pro 570, 575, or 580, with 4GB of memory for the 570 and 575, and 8GB video Memory for the 580.
The change that is most likely to be a nice change is that the 21.5-inch 4K Retina iMac now starts at $1299. This is down from $1499 for the previous version.
There were two "Sneak Peeks" at the keynote. These will be covered a bit later. For now, let us look at the software that was announced, starting with tvOS.
tvOS
There was only one announcement, for today, regarding the Apple TV. Even though it was only one announcement, it was a big one; the Amazon Prime Video is coming this fall. This means that anybody who likes to watch Amazon Prime Video will be able to do that directly on the Apple TV. It is possible to use AirPlay to get Amazon Video on your Apple TV today, but this is an inelegant solution.
watchOS
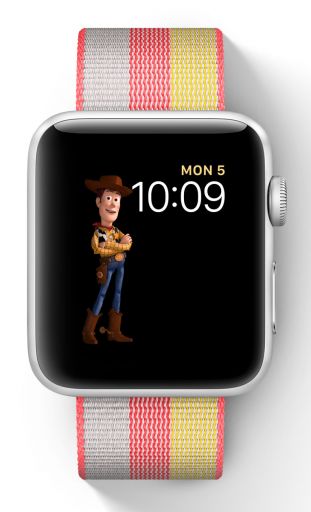
The Apple Watch has become a key aspect to many people's lives since its initial release in April of 2015. It took a couple of years, but the Apple has honed in on its main focus, health and fitness. watchOS 4 brings a few new features, the first being a new user interface for scrolling applications. Along side this there are a few new watch faces, Siri, Kaleidoscope, as well as coupel of new iconic characters. These characterse areWoody, Jessie, and Buzz from the Toy Story franchise.
Workouts are now easier under watchOS 4. To coincide with this, you are able to get more data to and from the Apple Watch. This is done through the use of NFC. The NFC capability will only available on newer equipment, but if it is available, it will be helpful. In particular, your heart rate will be sent from your Apple Watch to the gym equipment, whereas the incline rate from the gym equipment will be sent to your Apple Watch. This two-way communication allows for more data relating to health. This is likely only the beginning of the two-way communications between the Apple Watch and gym equipment.
The last item with watchOS is that Music can now be automatically synchronized over to your Apple Watch. This feature will allow you to always have music with you, particularly if you do not bring your iPhone with your when you exercise.
There are a bunch of other features for watchOS. For now let us look at some of the new features of iOS.
iOS 11

The most anticipated aspect of the announcement is the operating system for the iPhone, and iPad, iOS. iOS 11 brings a bunch of updates. One of the most used applications on iOS is Messages.
Messages
There are a couple of updates specifically for Messages. These revolve around iMessage apps, syncing, and Payments.
iMessage Apps and Stickers
With iOS 10, Apple added iMessage applications to iOS. One of the downsides to have so many iMessage apps and stickers is the difficulty of finding the specifc iMessage application you wanted to use. With iOS 11 it is now easier to find said application. You simply scroll through your iMessage application drawer and locate the application you are looking for. This was one of the biggest issues with iMessage in iOS 10. The next feature is syncing of messages.
Syncing
iOS 11 will synchronize all of your messages across all of your devices. This is possible because all of your iMessages will being stored in the cloud, securely. When you get a new device, all of your recent messages will be synchronized to the device. This will also reduce the amount of storage needed on your device for messages. The last item to highlight is actually an iMessage app, Payments.
Person to Person Payments

The biggest change to iMessage in iOS 11 will be the ability to send money directly to someone. Once you receive some money, it will be added to your Apple Pay Cash card. You can use this to purchase apps or pay for other services using your iPhone. Alternnatively you can transfer the money to your bank account.
App Store

Since the App Store was released nine years ago, it has remained mostly unchanged. It has changed slightly here and there with the style changes of iOS. However, that is going to change with iOS 11. Under iOS 11, the App Store is now getting a major redesign, similar to the one that Apple Music introduced. There are now two new and distinct tabs at the bottom; Games and Apps. These, as one might guess, are specifically for these two genres. This separation allows those specifically looking for Games to be able to find a game to play. The same goes for the other app categories.
The biggest change within the App Store is the "Today" tab. Similar to how Apple Music will suggest music for you, the App Store can now show you what is new today. This could be popular items, suggestions from the App Store curators, or even in-app purchases for games you are already playing.
Mark Up
One of the features within Mail on macOS Sierra was the ability to "Mark Up" images and send them to others. This feature is now available on screenshots within iOS 11. “Mark Up” is even better on an iPad Pro with an Apple Pencil, but the feature works across all iOS 11 devices. This means that you will be able to add notes and highlights to any screenshot. This will make collaboration even better.
iPad Changes
The biggest changes for iOS 11 are with the iPad. As was stated, "This is the biggest release of iOS for the iPad". The focus on the iPad Pro. They were not kidding. iOS 11 is chalk full of features specifically for the iPad. Some of these include:
- Update for the Dock
- Improvements to Split View & Drag and Drop
- Consolidated Files
There is a lot more that has been added, but these are the biggest items and we will focus on these. Let us start with the Dock.
The Dock
Under iOS 10 and previous versions, the dock on the iPad was limited to 5 items, regardless of the size of the iPad. This meant that there was a lot of empty space between applications. This is no longer the case with iOS 11. Instead, you are now able to fill up the dock with as many applications as you would like. Additionally, the dock will house any recent items and will even predict what applications you may want.
Split View
Split View came to the iPad with iOS 9 in 2015. At the time you were able to run more than one application at the same time. This has been the case, but now with iOS 11, you are able to drag and drop all types of data between applications. This means that instead of needing to manually copy and paste, or send a picture to another application. This will make things even quicker for many users.

Alongside Drag and Drop, applications that you pair together will now stay together. This means that if you like to have two applications open side by side, it will now be remembered, which will only increase productivity.
Files.app
The last thing to know about the iPad, and iPhone, is that all of your files will now be viewable into a single application. This means that if you have files stored in iCloud, One Drive, and Dropbox you will be able to see all of them all at once instead of needing to go to different applications to get all of the files that you have. This will make it even easier with Drag and Drop to be able to find items and place them onto applications.
There are definitely many more features, however these are some of the biggest. Now, let us move on to macOS.
macOS

It is not surprising to see a new version of macOS at Apple's World Wide Developer Conference. Each year there is a new name to accompany the new operating system. macOS 10.13 is code-named "High Sierra". This is similar to the naming convention used by Mac OS X 10.6 Snow Leopard and OS X 10.8 Mountain Lion. This signifies that while there were some user facing features, these updates were aimed at under the hood improvements.
macOS High Sierra does not contain a huge number of new feeatures, except there are a ton of under the hood changes. The lowest level that one interacts with every day, the file system. iOS 10.3 brought the Apple File System (APFS) to iOS devices,
macOS High Sierra brings APFS to the Mac. This will be the default going forward. One of the things that many users use often is Safari. There have been a couple of changes in Safari.
Safari
The biggest change in Safari on macOS High Sierra is that Autoplay videos will no longer play, automatically. They are still able to be played, but they will be muted by default. Having autoplay videos not play automatically will only improve a user’s experience.
One of the downsides of the the modern web is the amount of tracking that is done has become and just how it occurs across all types of websites. This has changed with Safari under macOS High Sierra. Now, Safari will cordon off those sites that attempt to track your data and it will remove the data, so you cannot be tracked all over the web. The ads will still display, so it will not break the internet, but it should become a bit more pleasant.
There are some other technologies that are "under the hood" of macOS High Sierra, but these are not necessary to cover now. Let us look at the two products that Apple previewed.
Sneak Peeks
It is not often that Apple previews hardware, it has occurred before, but it is not often. Today Apple previewed two new products, the iMac Pro and HomePod. Let us start with the iMac Pro.
iMac Pro

The iMac Pro was briefly mentioned a couple months ago, when Apple sat down with a handful of journalists to spell out the future of the professional Mac. At that time there were no details. We now have some more information. First and foremost, the iMac Pro is designed for Professionals. This is particularly apparent with the STARTING price, of $4999. Yes, almost five thousand dollars is the starting price. The iMac Pro has the following specifications:
- Retina 5k Screen with Wide Color Gamut
- An 8, 10 or 18-Core Xeon Processor
- 32, 64, or 128GB of Memory
- 1TB SSD, configurable to 2TB or even 4TB
- AMD Radeon Pro Vega 56 graphics, with 8GB of memory, configurable to Radeon Pro Vega 64 with 16GB of memory
- 1080p FaceTime Camera
- Stereo Speakers with Four microphones
- 4 USB3 port
- 4 USB-C ports
- Bluetooth 4.2 wireless technology
- 10Gbps ethernet port
There is only one color for the iMac Pro, Space Gray. The peripherals are also Space Gray, this includes the keyboard, Magic Trackpad and Magic Mouse 2. The iMac Pro will be available in December 2017.
Mac Accessories
There is one new accessory for everybody today, a Magic Keyboard with a number pad. This is available today for $129. Let us look at the other sneak peek, the HomePod.
HomePod

One of the more anticipated items is what Apple would do regarding a smart home speaker. Today, they answered the question with the HomePod. The HomePod has a built-in A8 chip, the same one that powers the 4th generation Apple TV. Besides the processing chip, there are six microphones, and seven tweeters, each with their own drivers. The microphones and tweeters work in concert to be able to produce the best sound possible.
It does this through Spatial Awareness. Spatial Awareness will test the room that it is in and adjust the sound to each tweeter individually to produce the best sound possible. All of this is done within a 6.8 inches high cylinder that is surrounded by a wire mesh to allow the sound to flow through.
The HomePod is primarily designed to be a music speaker, however that is not all it can do. It also functions as a conduit to using Siri. You can ask Siri, "Who is the drummer in this song", "Play some Hip Hop", or even "Play this specific song" That is not all though, since it integrates with Siri, you can also say things like "Give me the news" or "Turn off the lights". The HomePod is fully integrated with HomeKit, so it can perform any of the same tasks that Siri can.
The HomePod will be available in December 2017 for $349. It comes in two colors, White and Space Grey. If you have more than one HomePod in the same room, they can both work in concert to produce even better sound. At launch, HomePod will be availble in the U.S., the UK, and Australia, with other countries coming next year.
Final Thoughts
Today's World Wide Developer Keynote presentation was a long, but feature rich presentation. The refreshed Macs and iPad Pros will provide even more for users. iOS 11 and macOS High Sierra will also provide a slew of new features. Both iOS 11 and macOS High Sierra will be available in the fall as free upgrades.
There was even more in the presentation that I did not cover here. You can watch the entire keynote on Apple's website.


