


A Review of the 14-inch M2 Max MacBook Pro

I will be the first to say that I am lucky enough to be able to afford a new iPhone every year, and pay for it outright. The same goes for the Apple Watch, which is approximately 1/4 of the cost of an iPhone, but it still stands. Unlike an iPhone and Apple Watch, I do not upgrade my other devices every year, or even with each new release. As an example, for the iPad, the average amount of time that I own an iPad has been about 668 days. Meanwhile, for the iPhone it has been just over 370 days.
In the entire time that I have been using Macs as my primary computer, which is just under 16 years, I have owned a total of seven computers, four desktops and three laptops. For the four desktops that I have owned, I have had them for an average of 1832 days, or just over 5 years. For the three Mac laptops, the 2007 Black MacBook, early-2015 13-inch MacBook Pro, and now the 14-inch M2 MacBook Pro. The average life of those is 2832 days, or 7.76 years. So, needless to say I do not upgrade my laptops all that often and when I do, they seem to be significant jumps in technology. This latest jump, from my early 2015 13-inch MacBook Pro to the 14-inch M2 Max MacBook Pro.
When I upgraded from my 2007 Black MacBook to the early 2015 MacBook Pro, it was a significant upgrade. I went from a spinning hard drive, non-retina display, and heavy machine to an SSD-based Retina machine. In that transition I lost the physical Super Drive, but that was a small price to pay for a reduction in weight and size, and significant speed increase.
Given that I waited just about the same amount of time for this upgrade, as a matter of fact it was a difference of 3 days, the transition from the early 2015 13-inch MacBook Pro to the early-2023 14-inch M2 MacBook Pro is just as significant of a jump. This time it was not the screen, there are improvements there as well, but it is more in terms of processor. The last transition for the laptops were one Intel processor to another, so it was mostly a known quantity. The SSD provided a significant speed. This time, the biggest improvement is due to going from Intel to Apple Silicon.
If you have been reading my site, or following me on any social media site, for any length of time, you are likely aware that this is not my first Apple Silicon machine. I actually have two existing Apple Silicon Macs, a 2020 base-model Mac Mini that I use strictly for testing and doing some development, and my primary computer is my M1 Max Mac Studio, which is my daily driver.
This review will be a long one, because going so long between laptops leaves a lot to cover. In fact, there will be two major sections to this review. The first area is in-depth features of the M2 MacBook Pro. Within this section will be my thoughts and observations of going from the early-2015 MacBook Pro to the early-2023 M2 MacBook Pro. The second area will be comparing the M1 Max to the M2 Max. So, let us start with aspects of the features of the M2 MacBook Pro.
Specs
Whenever I purchase a new Mac laptop I try to get the most that I can for my budget. For the first few Macs, I did not have a large budget, but as time has gone on the budgets that I have allocated for my purchases have increased. Therefore I have been able to purchase more substantial computers. The specs for the laptop that I am upgrading from, an early 2015 MacBook Pro, are:
- 13.3-inch LCD Screen.
- 2.7GHz Intel Core i5 (5th Generation Broadwell)
- Intel Iris Graphics 6100
- 16GB of Memory
- 256GB of Storage
At the time of purchase, these specs were the ones that fit within my budget. This was one of the "stock" models and the only change was the upgraded memory, because even then I knew that the base amount of 8GB would not be enough. I am not sure how Apple can still sell any machine with 8GB of memory today, but obviously people are willing to buy them. At the time, this was significantly less storage space than my desktop, which was a 21.5-inch mid-2011 iMac with 1TB of storage. But, the trade-off was the fact that the MacBook Pro had a solid state drive, which would be significantly faster. The 256GB of storage that I had on the laptop was plenty when I got it, but that amount of storage had become not enough by even 2020, and is definitely not enough for 2023.
Having calculated the average amount of time that I keep laptops, I opted to spend quite a bit more than with the next update. I had previously on a laptop. For my M2 MacBook Pro, I got the following specifications:
- 14-Inch Space Gray
- Apple M2 Max with 12-Core CPU
- 30-Core GPU
- 32GB of Unified Memory
- 2 TB of storage
The specifications on the M2 MacBook Pro are close the same specifications as my Mac Studio, except that the Mac Studio is an M1 Max, and has slightly fewer CPU and slightly fewer graphics cores. Given that my 2015 MacBook Pro did not have enough space towards the end of its life, I opted to beef up the M2 MacBook Pro quite a bit. I figured that by the time 7 years goes by, 2TB might still be enough space, but then it may not be. 32GB of unified memory is standard with the M2 Max processor, and I think that 64GB would be a bit too much memory for my laptop. Only time will tell if this was the right decision.
The fact that my M1 Mac Studio and 14-inch M2 MacBook Pro have almost the same specifications is very reminiscent of my first two Macs, which were the 20-inch Core 2 Duo iMac and the 2007 Black MacBook. Those machines were effectively the exact same, except for screen size and they had slightly different hard drive sizes; 250GB in the 20-inch iMac and 160GB in the 2007 MacBook Pro.
Before we dive into the actual M2 MacBook Pro, let us look at the M2 System on a Chip, or SOC.
M2 System on a Chip
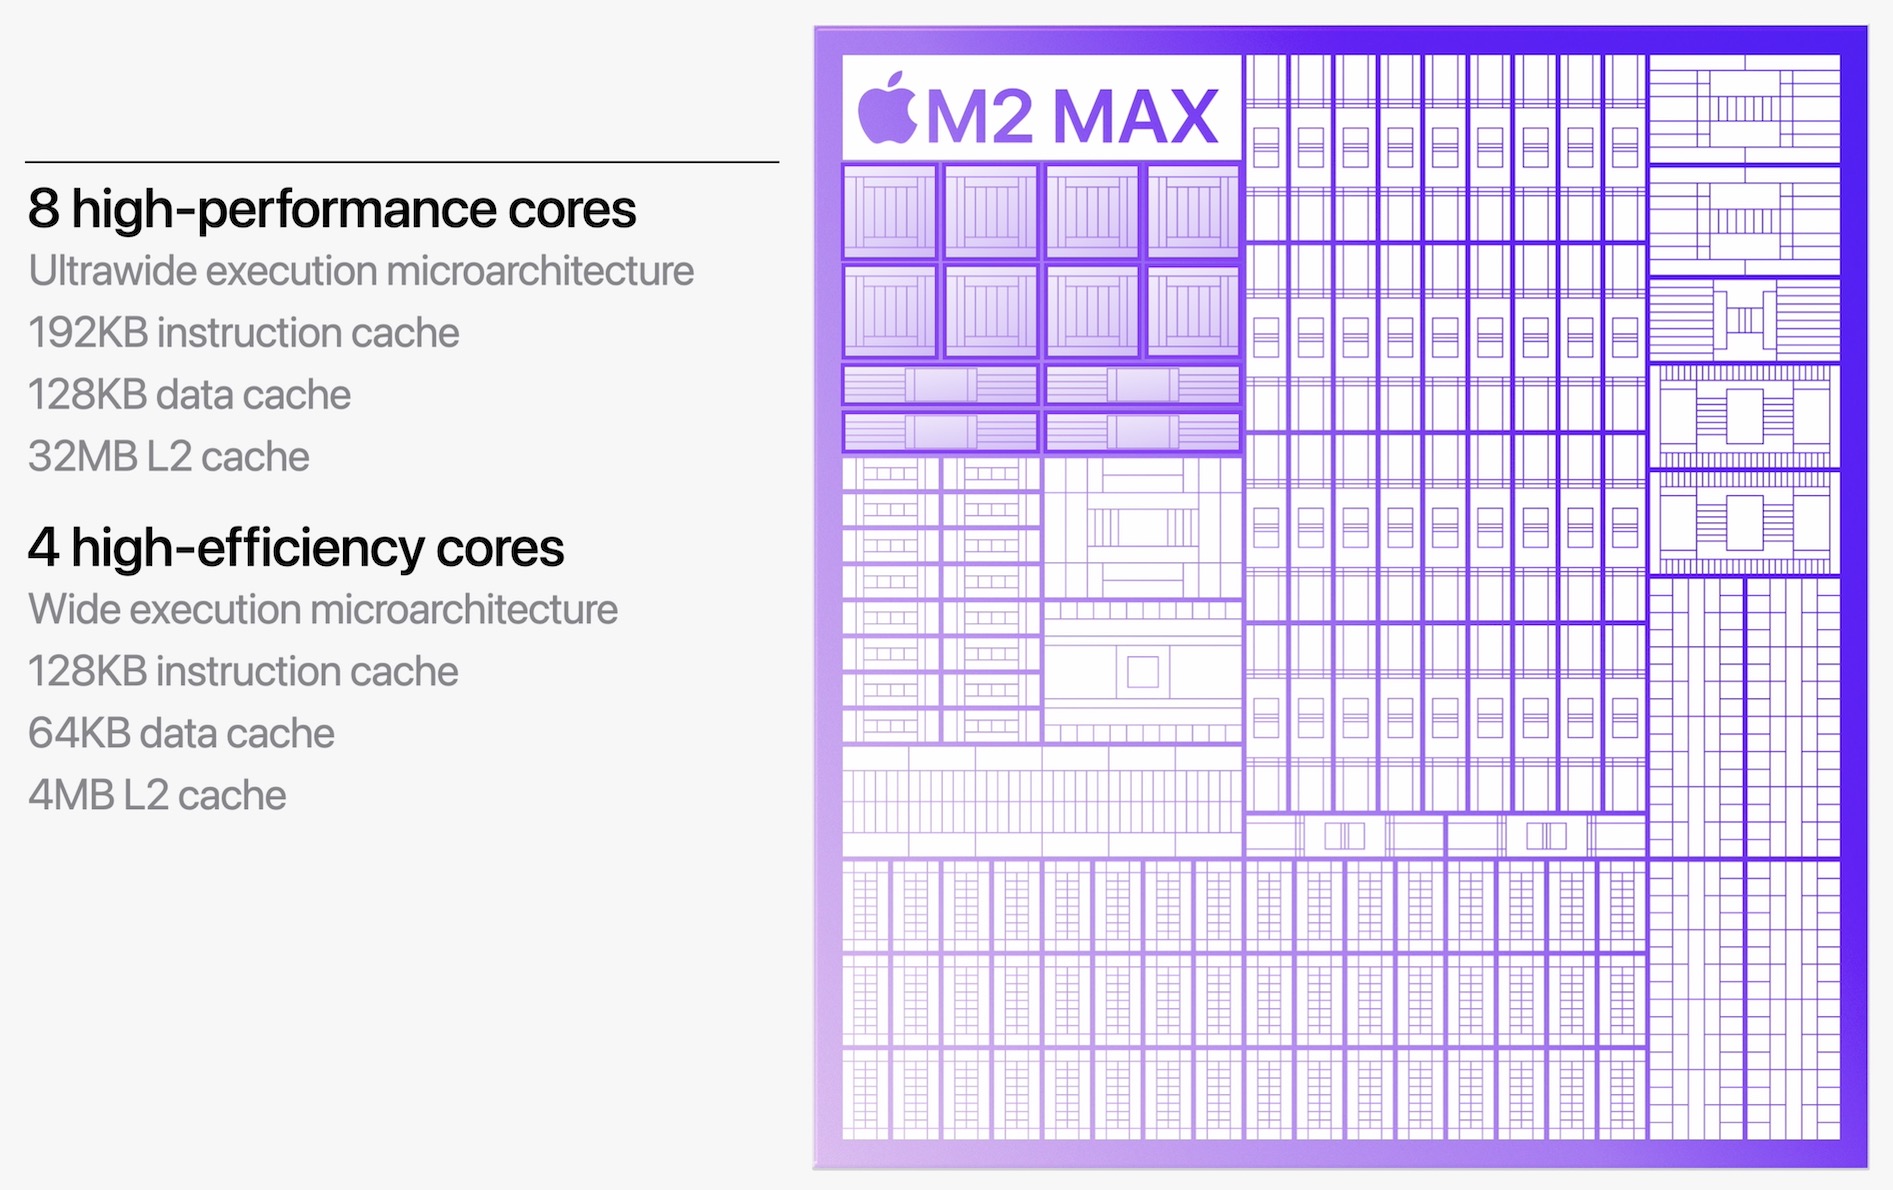
As o this writing, we are just over two and half years since Apple introduced Apple Silicon to the world, The first Apple Silicon machines were introduced in November of 2020. At the time Apple touted that Apple Silicon was significantly faster than their previous Intel machines. Many were skeptical that it could actually be the case because it did not see possible. However, it turns out that Apple was telling the truth.
Apple has publicly stated that when they got did the initial testing of the M1 SOCs even they were surprised at the performance of Apple Silicon. When the M2 first debuted with the M2 MacBook Air in July of 2022, some were disappointed in the fact that its as not significantly faster than the M1. However, I suspect that they do not understand how chip architecture actually works.
The Mac has seen significant increases in performance at different times in its history. In fact, there have been two times, and these were all architecture changes. The first transition was from Motorola PowerPC to Intel and now Intel to Apple Silicon. Changing architectures is not something you take on lightly. There are usually significant improvements that can be gained by switching architectures. This was the case for both transitions.
When Apple went from PowerPC to Intel, the rational was because Apple got all of the efficiency out of the PowerPC chip. Part of this was that IBM was not able to deliver the power needed for the highest-end products. When Apple moved from PowerPC to Intel, they not only gained power improvements, but also got significant speed improvements. Beyond this, with Intel being the architecture you were able to run Windows in either a virtual machine or via Boot Camp.
The transition from PowerPC to Intel, while significant, was not as significant as going from Intel to Apple Silicon.
Apple's Custom Chips
When Apple decided to create the iPhone they knew that battery life would be an important aspect to making the product successful. In order to accomplish this, they needed a system designed for power efficiency. They landed on the ARM architecture. ARM previously stood for Advanced RISC Machines. RISC is an acronym for Reduced Instruction Set Computer. RISC is an architecture that uses more, but simpler code to accomplish a task. When the original iPhone was introduced it used Samsung manufactured ARM processors. Power efficiency and battery life were so important that they under clocked the processor to 412MHz to be able to save on battery life.
In April of 2008 Apple bought a company called P.A. Semi. P.A. Semi was a company that designed chips. At WWDC 2008, Apple announced that the acquisition was meant to build custom chips for the iPod, and iPhone. The first P.A. Semi custom chip was the A4. This was introduced in 2010 , with the iPhone 4. This was just the first chip, more would arrive in the coming years. All of the early chips, A4 through A7, were manufactured by Samsung. The A8, and newer chips, have all been manufactured by Taiwan Semiconductor Manufacturing Company, or TSMC. This latter fact is important, because TSMC is the leader in chip manufacturing.
The M1 Family
Fast forward to 2020 and Apple announces the M1 Processor. The M1 used TSMC's 5 nanometer, or 5nm, process. The process size indicates how big each transistor is on the chip. So in the case of the M1 each transistor is 5 one-millionths of a meter, in other words very, very small. This small size allows for more transistors to fit into the same size package. Furthermore, the smaller the transistor size, the less power that is needed.
The M2 processor still uses a 5nm process, but it is the 2nd-generation of the process. In comparison, the M2 is approximately 20% faster than the M1. This is for the base M2 as compared to the M1. However, the difference between the M2 Max and M1 Max does not seem to be that drastic, at least not in the benchmarks that I ran, but hose will be covered at the end of the review.
Next, let us look at the actual aspects of the M2 MacBook Pro, starting with the Physical Size.
Physical Size and Case
Even though you may not think about it, the physical size of the device can be important. When I looked at the physical sizes of the two MacBook Pros, I noticed that they were very similar.
2015 MBP
Height: 0.71 inch (1.8 cm)
Width: 12.35 inches (31.4 cm)
Depth: 8.62 inches (21.9 cm)
Weight: 3.48 pounds (1.58 kg)
M2 Max MBP
Height 0.61 inch (1.55 cm)
Width: 12.31 inches (31.26 cm)
Depth: 8.71 inches (22.12 cm)
Weight (M2 Max): 3.6 pounds (1.63 kg)
While there are absolute differences between the two MacBook Pros, most of them are very close. The biggest difference is the height. Even though the height is only one tenth of an inch, this makes the 14-inch MacBook Pro 16% shorter than the 2015 MacBook Pro. I do not know if it will make a difference in a day to day manner, but it is noticeable.
Shape
One area where specs themselves cannot articulate a change, is the shape of the outside case. The 2015 MacBook Pro has more rounded shape around the edges, where as the M2 MacBook Pro has more of a squared-off shape, but still quite rounded. That is not to say that it has sharp 90-degree edges, they are still rounded, it just that the radius is much less than that of the 2015 MacBook Pro.
When you look at the shapes the place where it is easily notice the changes is when you are looking at the bottom case, which has a couple of changes of its own.
Bottom Case

It might seem strange to talk about the bottom of the case, but there are a couple of things on the bottom of the case that I think warrant discussion.
The first of these is an engraving on the bottom of the laptop that says "MacBook Pro". As you might expect, this is centered both horizontally and vertically on the bottom of the case. While my previous MacBook Pros did say "MacBook Pro" this was small and towards the top of the case. If you were to run your finger over this engraving on the previous model you would feel a minor bump. However, with the 14-inch M2 MacBook Pro, it is a prominent engraving of "MacBook Pro"
The second item about the bottom case that should be mentioned is the feet. AirFlow is an important aspect to just about every laptop. In order to provide the best airflow for all parts of the device should be cooled, including the bottom. In order to provide enough airflow the laptop must be elevated. On the 14-inch M2 MacBook Pro, this is done by making sure the laptop is far enough off of a surface to allow proper airflow.
On my previous MacBook Pro, there were effectively no feet. The "feet" were just there to cover the screw holes of the MacBook Pro. This is not the case on the 14-inch M2 MacBook Pro. These feet actually lift the laptop up off of a surface by about 0.125 inches, or 0.32cm. This should provide plenty of airflow.
These are two very minor items, but they are little details that you might not initially notice. Now, let us switch to something you will absolutely notice, the screen.
Screen
As mentioned above, the physical size of the two MacBook Pros is very similar, but if they are the same physical size, then how can they have two different screen sizes? That is simple, it comes down to the bezels. The bezel of any screen is the portion that creates a border around the screen. On all Macs, these bezels are black.
The size of the bezels on the 2015 MacBook Pro depend on the location. The top bezel is 0.5in, or 1.27cm, wide, while the sides and bottom are all 0.375in or 0.95cm wide. The reason that the top bezel is so large is because the top bezel hides the FaceTime camera, which is housed entirely in the bezel. In order to not create such a disparity between the two, the side and bottom bezels are only an 0.125 inches smaller, which is the same size as the sides. The difference is noticeable if one looks closely, but not that noticeable in day to day usage.
Now, compare the older bezel to the 14-inch MacBook Pro where all bezels are 0.125in or 0.32cm wide. This reductio in bezel size has allowed the physical screen size to expand from 13.3-inch to 14.2-inches. The top portion of the 14-inch M2 MacBook Pro screen still houses the FaceTime camera as well as the other sensors. So, how does Apple handle this? With an approach they have used on other devices, by using a notch.
The Notch

When Apple introduced the iPhone X in 2017 one of the most noticeable, and iconic, features of the device is that there was a notch at the top of the screen. The notch on the iPhone X housed the FaceTime camera and Face ID sensor array. The notch has been, and is still, present on all Face ID enabled phones, excluding the iPhone 14 Pro and iPhone 14 Pro Max, where there is now a Dynamic Island.
Apple did not just leave the areas around the notch, commonly called the "ears" empty. Instead, the status icons were placed in the areas on either side of the notch. This can include items like the cell signal, battery level, and cellular network.
When it came time to change up the MacBook Pro, Apple took some cues from the iPhone line and created something that fits well on the MacBook Pro. On the right side are the Control Center icons, like Battery Power, Wi-Fi connection, and the Date and Time, just as it always has been on the Mac.
On the left side is the set of Menu items for a particular app. App developers can define custom menus and the number of menu items can become numerous. One prime example is with Xcode where there are 12 top level menu items, and that is without customizations. What will happen when you open an app with a lot of menus is that the menus will move to far side of the notch.

It should be noted that developers will need to adopt this new behavior for it to work. However, if there is an app has not been designed with the notch in mind, you can make a change that will force the menu below the notch.
Adjusting an App to sit below the Notch
- Open up the Applications Folder.
- Locate the app that is not working well with the notch.
- Right-Mouse click, or control-click on the app to bring up the context menu.
- Click on the "Get Info" option. An info panel should appear.
- Enable the option "Scale to fit below built-in camera".
Once you have enabled the checkbox, you will need to restart the app for the changes to take effect. If you do not see the "Scale to fit below built-in camera", then the app should work properly with the notch.
Besides accommodating more menu items when necessary, the Menu bar has also changed a bit. With the notch being in the top of the screen, the Menu Bar has also become taller, so that the notch will fit nicely in the display and not be jutting out into the rest of the screen. What this means is that apps will not be able to hide under the notch, which is the expected behavior for longtime macOS users.
As I stated in my initial thoughts, when you first use a MacBook Pro with the notch, it may be something you notice quite often, much like it would on the iPhone. After a while though it is possible, and likely, that you will not notice it as much and it will just become another part of the screen. In my time using the M2 MacBook Pro, this has definitely been the case. I am not sure if this is just because I am used to having this experience with the iPhone, or if it is just that I am focusing on what I am doing.
Back to the Screen
There is one last thing to mention about the screen. Like the notch, the screen takes some other cues from the Face ID-enabled iPhones, in that the corners of the screen are rounded to match the screen. The corners are not squared off. It would have been easy enough for Apple to have squared off edges. Instead they opted for rounded ones, which perfectly match the corner radius of the MacBook Pro itself. This is one of the small details that many will not notice, but it is still one of those details that Apple is known to care about.
Now that we have covered the screen, let us look at some specifics with the display itself.
Display Technologies
The display on almost any Mac is one of the most used parts of any Mac, and this is absolutely the case for a laptop, for most use cases. If all you needed was the basics, then even a screen from a 2007 MacBook would suffice. However, time marches on and technology progresses. Apple has included enhancements over the years and the M2 MacBook Pro is no exception. Some of these features include ProMotion and True Tone. Let us look at both of these.
ProMotion
One of the features that was added with the M1 MacBook Pros is ProMotion. ProMotion is a technology that will adaptively change the refresh rate of a display to provide the best experience, while possibly saving battery power. ProMotion began life on the 2nd generation 12.9-inch iPad Pro, released in 2017. In 2021, the same technology made its way to the iPhone starting with the iPhone 13 Pro and iPhone 13 Pro Max. On the iPhone and iPad, the lowest refresh rate is 10Hz and the highest is 120Hz.
The first Macs to receive ProMotion were the 14-inch and 16-inch M1 MacBook Pros released in 2021. The lowest refresh rate that the MacBook Pros support is 24Hz, and the highest is 120Hz. This maximum is the same as all other current devices that support ProMotion, at least as of this writing.
You do not need to do anything to enable ProMotion, it is enabled by default. Even though most will not be affected by it, there are some who may not be able to handle the higher refresh rates of ProMotion, so Apple has provided a means of turning it off.
Disabling ProMotion
In the event that you need to disable ProMotion, you can do so by using the following steps:
- Open "System Preferences".
- Scroll down to "Displays".
- Click on "Displays" to open the Display Preferences.
- Locate the setting that says "Refresh Rate".
- Click on the dropdown next to "Refresh Rate".
- Select the refresh rate that you need.
The available refresh rates are:
- 60Hz
- 59.94Hz
- 50Hz
- 48Hz
- 47.95Hz
Setting this refresh rate can also be useful for those who need to check how video will appear at a particular refresh rate. Now, let us turn to True Tone.
True Tone
Screens can be used in a variety of different environments. For desktops it is not likely that it will be used in too many places, but even then conditions can differ depending on the amount of ambient light. In order to provide the most consistent colors Apple has created a technology called True Tone.
True Tone will adjust the color of the light being emitted from a display in order to provide the most consistent colors. On the M2 MacBook Pro, this is done using the ambient light sensors that are housed within the Face Time sensor array. This is not a feature that was present on my 2015 MacBook Pro, so it should be a good feature in the long term.
Resolutions
The 14-inch M2 MacBook Pro has a total of five different screen resolution options. These options from smallest resolution to highest resolution are:
- 1024 x 665
- 1147 x 745
- 1252 x 879
- 1512 x 982 (default)
- 1800 x 1169
These resolutions may seem a bit strange, and they might be. There are two factors to this. The first is the screen size of 14.2-inches, along with the reduced bezels. Therefore, the screen resolution will be different from the ones you might be accustom to.
The second thing to keep in mind is that the the MacBook Pro has a Retina display, so the actual resolutions are double what is shown. Even though there is a limited number of options to choose from, there is actually one additional option on the M2 MacBook Pro as compared to my early 2015 MacBook Pro which only had four options.
Now, onto another section, charging.
MagSafe and Charging

It could be argued that one of the most innovative things that Apple has ever created was MagSafe, specifically MagSafe for the MacBook and MacBook Pro lines. MagSafe provides the ability to power a MacBook Pro with a custom magnetic power cable. In the previous models, the magnetic end of the MagSafe cable was attached to the actual power brick.
This is especially true if you need to charge and have to string the power brick and cable somewhere. If you trip, instead of your entire laptop going flying across the room, the MagSafe cable will disconnect from the laptop and that will go flying instead. This is a superior approach, at least in my opinion. That is not to diminish the usability of MagSafe on the iPhones, but it is extremely helpful on the MacBook Pro.
Starting in 2016 Apple moved their laptops to USB-C only. This removed the MagSafe charging that had been present since 2006. Instead of using MagSafe for charging, you would use USB-C. However, this meant that if you needed to charge you had to use one of your USB-C ports, on the 12-inch MacBook this could be problematic, as it only had a single USB-C port.
MagSafe made a comeback in 2021 with the release of the 14-inch and 16-inch MacBook Pros. The 14-inch M2 MacBook Pro is continues this. There is still a MagSafe cable, but instead of being attached to the power brick, the other end of the MagSafe cable is now USB-C. This provides a couple of benefits. The first is that you can replace a MagSafe cable if needed. This also means that you can use any USB-C charging brick, with sufficient wattage, to charge your MacBook Pro. This includes using a Studio Display if desired.
When Apple brought MagSafe back to the Mac, they could have easily removed the ability to charge over USB-C, but they did not. You can still charge over USB-C if you would like. This is useful in case you need to charge but do not have your MagSafe cable.
There is one last change to mention. The ends of the MagSafe cable are now color-matched to the laptop. Therefore, if you have a Space Gray MacBook, the end will be Space Gray as well. Previously, these were silver-only. Furthermore, the MagSafe cable is braided, much like the other cables that Apple has been providing with its other products, like the HomePod minis, iPhones, and iPads.
For me, this is the exact same experience that I had on all of my 2007 MacBook and 2015 MacBook Pro. In fact, when I got my M2 MacBook Pro, I simply swapped out the power brick to the 96-watt brick that comes with the MacBook Pro and the MacBook Pro and it is like nothing has changed at all for me, at least when it comes to charging. Now, on the topic of USB-C let us look at the other ports.
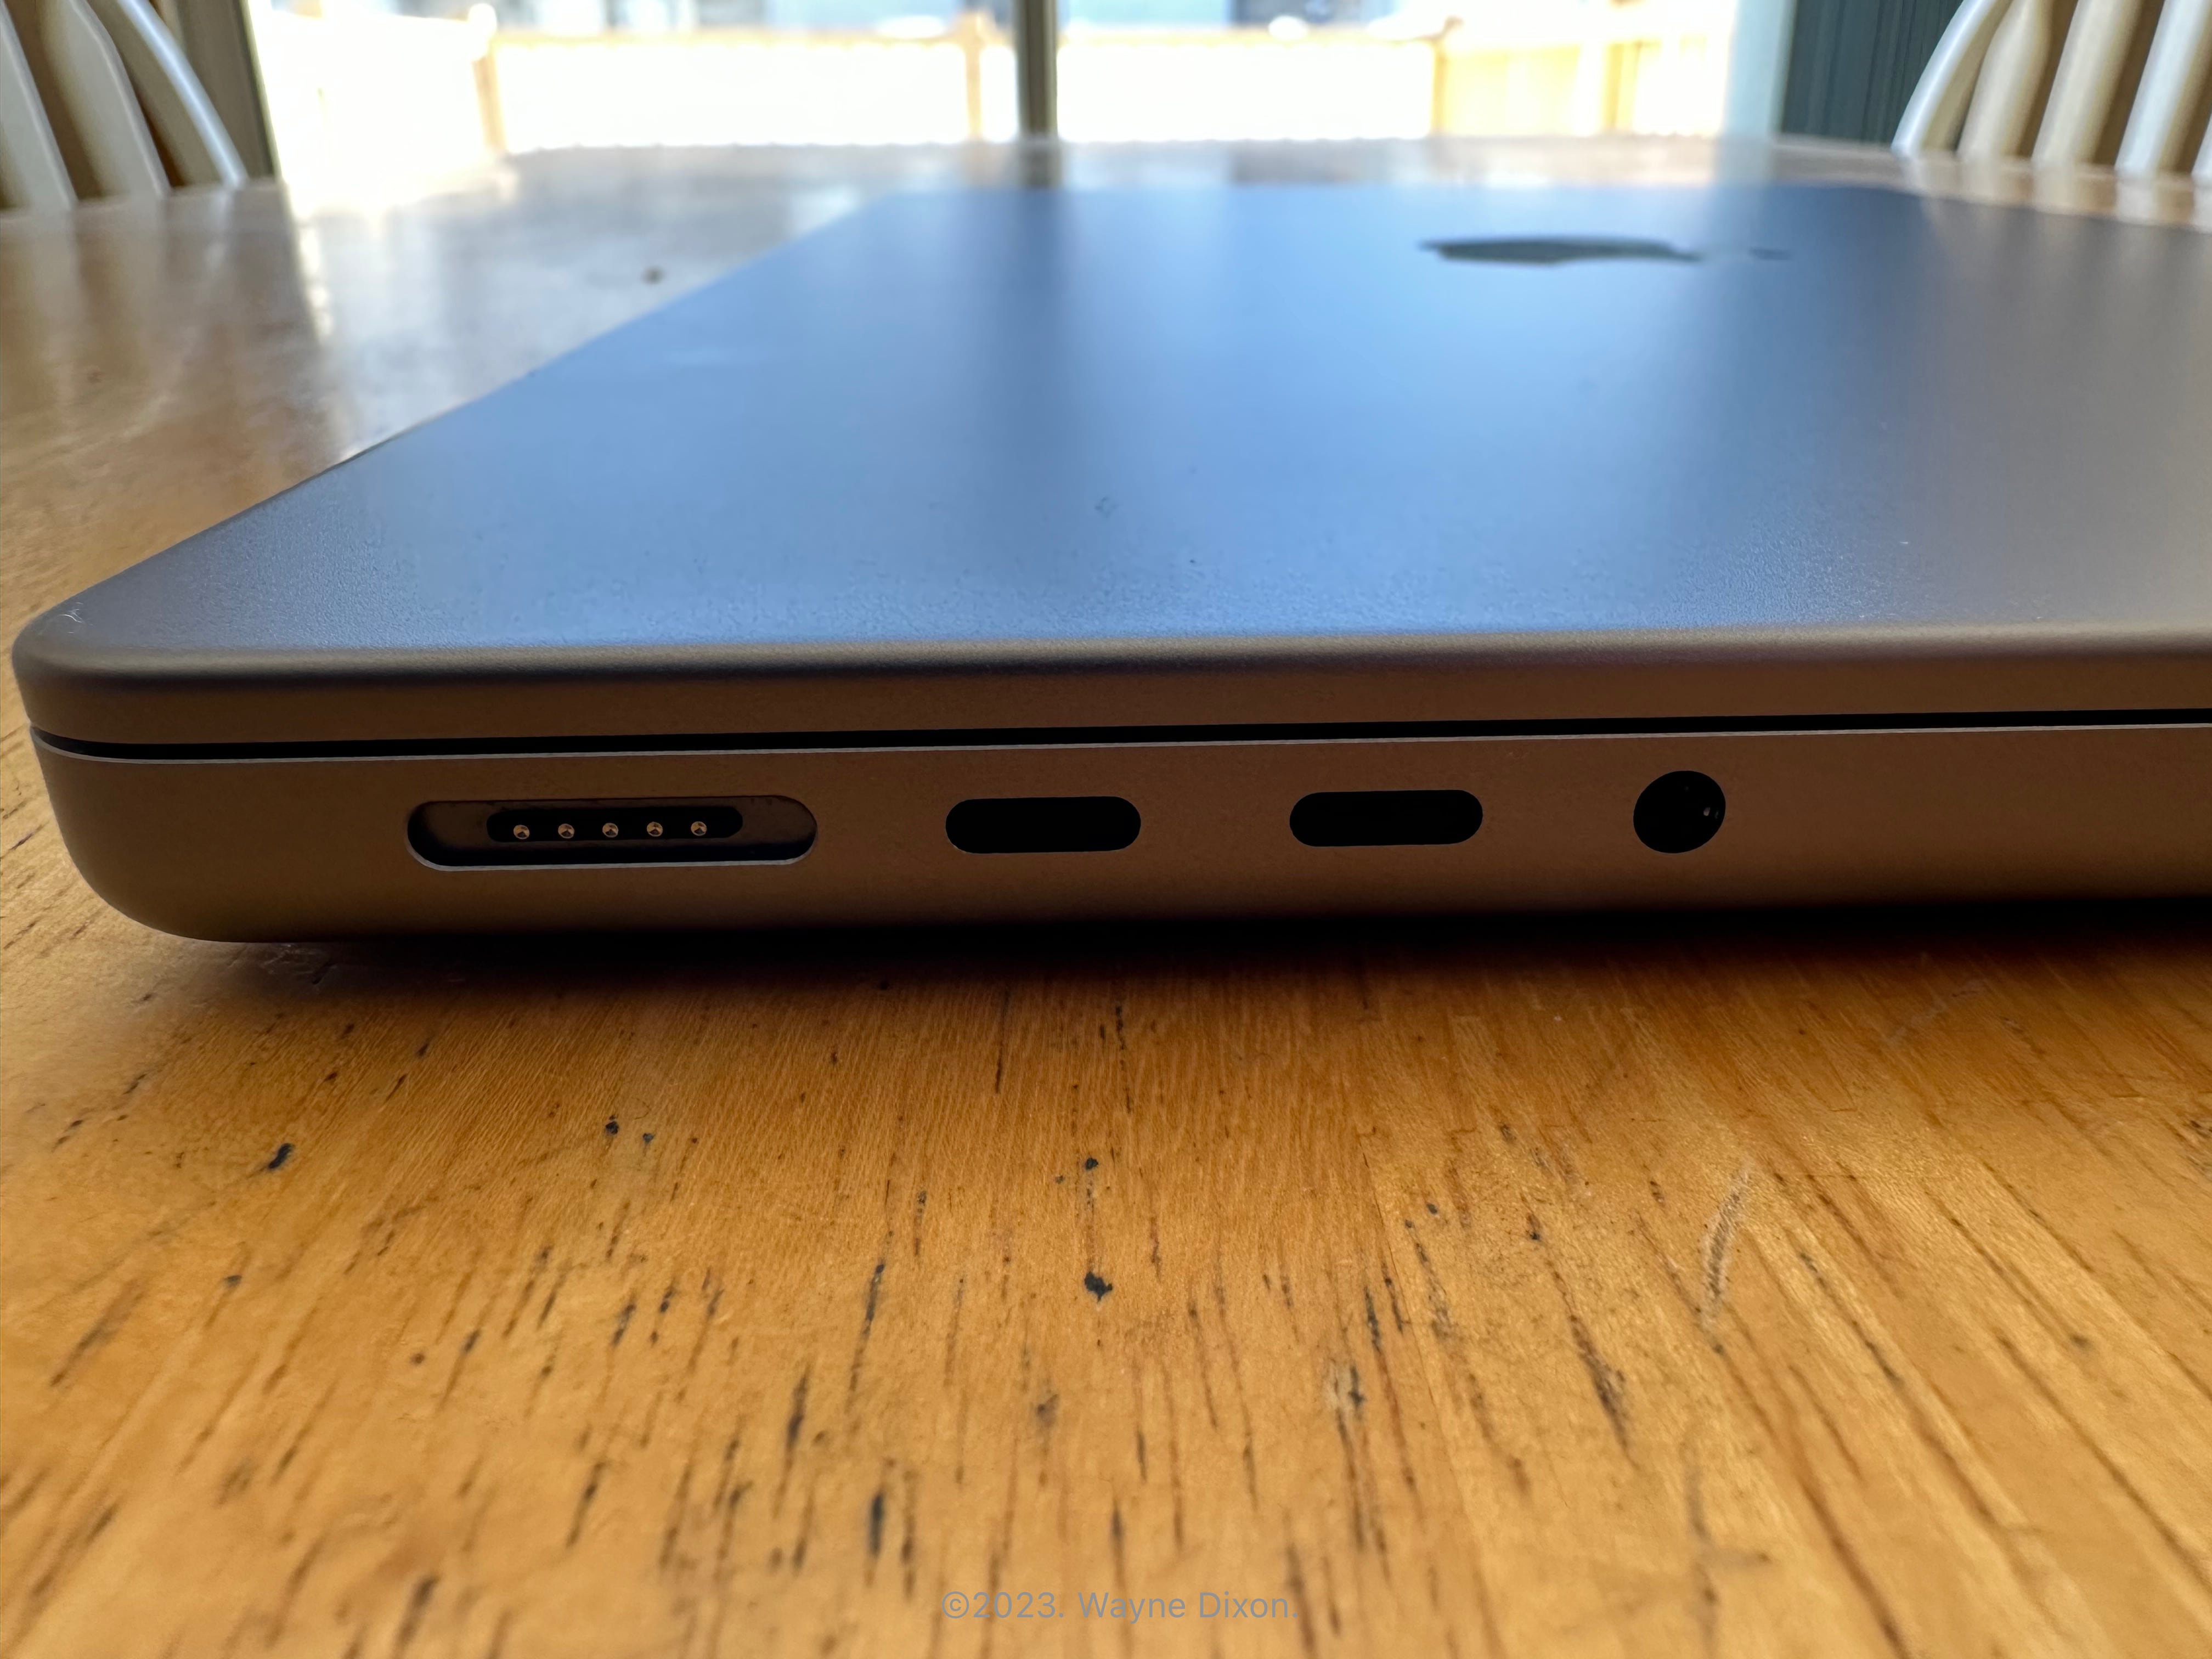
Ports
As mentioned earlier, The average number of days that I keep a Mac laptop is about 2830 days, or 7.76 years. What this means is that I missed out on the entire "USB-C only" and butterfly keyboard era of MacBook Pros. This era was one where it seemed as though form was more important than functionality.
What I find surprisingly interesting is that outside of going from USB-A to USB-C, and adding Touch ID, all of the ports on my most recent MacBook Pros are pretty much the same as before.
The M2 MacBook Pro has an HDMI port, an SD-Card Slot, a headphone jack, and three Thunderbolt/USB 4 ports. The Thunderbolt Ports should be able to handle data up to 40Gbps when in either Thunderbolt or USB modes.
My 2015 MacBook Pro also had an SD-Card slot, headphone jack, and HDMI port. I will be honest, it is not likely that I will use those ports, however, should I find myself needing to use them, it will be nice to have them on the MacBook Pro.
Multiple Monitors
The M2 MacBook Pro is capable of supporting multiple external monitors. The number and supported resolution does depend on the processor that one uses. Below are the possible configuration available
M2 Pro
- Two External Displays up to 6K resolution at 60Hz over thunderbolt
- One external display up to 6K resolution at 60Hz over thunderbolt and one 4K external display at up to 144Hz over HDMI.
M2 Max
- Up to three external displays up to 6K resolution at 60Hz over thunderbolt and one 4K external display at 144Hz over HDMI.
- Up to two external displays up to 6K resolution at 60Hz over thunderbolt and one 8K external display at 60Hz over HDMI.
- Up to two external displays up to 6K resolution at 60Hz over thunderbolt and one 4K external display at 240Hz over HDMI.
It should be noted that this is the first time that an 8K display has been supported on any Mac. This is possible due to the M2 MacBook Pro having support for the HDMI 2.1 spec. HDMI 2.1 is what allows not only the higher 8K resolution but also for the higher refresh rate of 144Hz and 240Hz.
I do not know if I will connect any external monitors to my MacBook Pro. I mean, it is possible that I would have to at some point, but I typically use my laptop in its portable configuration. If the M2 MacBook Pro were my primary computer, then it is entirely possible that I would connect external monitors. It would not be the first time in my history of using Macs where I would end up using a laptop more than a desktop because the laptop was a superior experience.
Speakers
If you were to ask me if I use the speakers on my MacBook Pro that often, I would say that I do not. That is not to say that I never use them. I have listened to a quick video a few times, and on rare occasion I will listen to a song.. The reason for this is two-fold. The first reason is because I am almost always using headphones, so I prefer using those. The second reason is that the speakers in my 2015 MacBook Pro are not been the best. I mean, the speakers do work but they do not provide the best audio quality.
My usage on my MacBook is inverse of my iPhone. Despite the quality of the iPhone's speaker being nowhere close to even my iPad, I will use the external speaker on my iPhone if necessary. I still prefer using headphones, but in a pinch I do use the iPhone speaker. Typically, this is only for brief amounts of time like listening to a song, or finishing a podcast. Again, I am constantly using headphones.
The speakers on the 14-inch M2 MacBook Pro are a vast improvement over my 2015 MacBook Pro. They are definitely not as good as say even a HomePod mini, but they are much better than before. I listened to a couple of songs that I know really well and I can tell what it should sound like.
Given the amount of space it should not be too surprising that the MacBook Pro cannot generate that much bass, but the treble and vocals are clear and very listenable. The M2 MacBook Pro speakers are able to handle playing Dolby Atmos tracks without any problem and they do provide some surround sound and depth when listening to a compatible track. Even stereo-only tracks still sound really good on the built-in speakers.
It is possible that I may use the speakers on this laptop more than I have on my previous laptops, but only time will tell on that.
Keyboard and TrackPad

One of the areas where you interact the most with any laptop is through the Keyboard and TrackPad. Each of these is almost essential for any Mac user.
Keyboard
As mentioned above, I missed the whole set of butterfly keyboard issues that were present on the 2016 to 2019 Intel MacBook Pros. The keyboard on the M2 MacBook Pro is very similar to that of the Magic Keyboard with Touch ID. It does seem like the travel on this keyboard is a bit less than on the Magic Keyboard with Touch ID, but it does not feel bad to type on at all. It is definitely less squishy than my 2015 MacBook Pro.
There is another item somewhat related to key travel on both laptops, and that is the backlight. On the 14-inch M2 MacBook Pro and the early 2015 13.3-inch MacBook Pro there has been a backlight. The further key travel on the early 2015 MacBook Pro actually means that more light emanating from the early 2015 MacBook Pro, and it isn to from the brightness of the backlight, but this is due to the travel because the keys sit a bit higher on the 2015 MacBook Pro than the M2 MacBook Pro, and therefore more light comes out around the edges.
If I look at both laptops from directly above, there is a small outline on the M2 MacBook Pro with a small amount of light emanating from the keys on the M2 MacBook Pro, but there is definitely more light on the 2015 MacBook Pro.
The one thing I would like to have seen is a way to adjust the keyboard brightness from the function keys on the M2 MacBook Pro, like I could with the 2015 MacBook Pro, but the brightness can be easily adjusted within the Keyboard section of System Settings within macOS, so this is more of a convenience item.
Touch ID
On the topic of Touch ID, it is nice to have Touch ID on a laptop. The 2015 MacBook Pro that I was using previously was one of the last models that did not have support for Touch ID. This was because the Touch ID was introduced on the 13-inch and 15-inch MacBook Pros in 2016.
I do have a late 2019 16-inch MacBook Pro provided my employer that has Touch ID and that has a TouchBar on it. I much prefer the physical function keys instead of the Touch Bar. The physical keys are much easier to determine what you are doing as compared to the Touch Bar.
This is not the first Mac that I have owned that has Touch ID support, my Mac Studio has support for Touch ID through the Magic Keyboard with Touch ID that is paired with it. And now my experience is consistent between my Macs.
TrackPad
The TrackPad on the M2 MacBook Pro is a bit wider and a bit taller than on my early 2015 MacBook Pro. Both of the machines have haptic trackpads, meaning that they are do not have physical controls. The larger trackpad is a nice enhancement, but otherwise it is unchanged from the previous trackpads. This is not a bad thing, it just means that Apple has create a good design for the their trackpads on the MacBook Pros.
Battery Life
One of the most important factors for any laptop is its battery life. Having owned my early 2015 MacBook Pro for almost 8 years, it would be an understatement to say that the battery life on it was not the best, even with my 2015 MacBook Pro battery not having its original battery/
At one point I got the "Battery Needs Servicing" message on my MacBook Pro. The battery had a bulge in it, and it needed to be replaced. Of course, this happened when it was out of warranty. The cost to replace the battery came to about $230, which is not too bad for, at the time, a 6 year old laptop. With the 2015 MacBook Pros, you could not just replace the battery, but the keyboard also had to be replaced, which was something I did not know at the time. It was a welcome replacement though because at the time of its replacement, some letter of the keys had that worn off.
When the 2015 MacBook Pro was announced, Apple indicated that the MacBook Pro got up to 10 hours of battery life when browsing the web, and 12 hours when watching iTunes content. Even when the battery was new I would say it was optimistic to get 10 hours of life out of it, but I could use it for extended periods of time without having to necessary be weary of the battery dying.
Apple's announcement of the M2 MacBook Pro, touted the "longest battery life of any Mac" at 22 hours. This is while watching Apple TV content on the 16-inch MacBook Pro. For the 14-inch MacBook Pro the specifications state 12 hours of wireless web use and 18 hours for Apple TV movie playback.
I have not done an extensive test of the battery life. But, as you might expect from an Apple Silicon Mac laptop, the battery life has been great so far. Of course part of this is because the battery is brand new and as of this writing has less than 5 cycles on it. It will likely get to hundreds of cycles before needing to be replaced. By that point, I suspect that I will notice any sort of degradation of the battery. I do not anticipate needing to have the battery go a full 18 hours without charging, but stranger things have happened.
Performance
Before we delve into the actual benchmarks, because they are obligatory in any review that I write, we need to discuss the performance of the 14-inch M2 Max MacBook Pro. Throughout all of my testing, which includes building apps, generating content for my website, including this review, and even transcoding some videos. No matter what I did, I could not get the fans to spin up to any audible level. I am sure that the fans would spin up at some point, but it will likely need to be a lot for it to happen.
Comparison of an M1 Max to the M2 Max

As mentioned above, I tend to keep my desktops for just about exactly five years and my laptops for just over 7.76 years. In late 2021, I knew it was coming close to time to replace one of my machines. At the time I gave serious consideration about replacing my early 2015 laptop, however, another mitigating thing occurred that made me replace my 2017 27-inch iMac first, a cracked screen.
At some point in 2020 I noticed that my 27-inch iMac had a crack in the screen. When I first noticed it, the crack was from the right edge to just a tad bit into the desktop area of the screen. This was a small amount and was hardly noticeable when using the iMac. However, as time went on the length of the crack in the iMac screen grew until it reached about 18 inches in length overall. Why did this crack occur? To this day I do not know. The expansion of the crack in the screen resulted in me replacing my iMac with an M1 Max. You can read the full review if you so desire. Ultimately, this proved to be the right thing to do, because just a few months after I got my Mac Studio, the SSD within the iMac died. The iMac I got was a Fusion Drive, so it included both an SSD and a traditional spinning hard drive. Even though the SSD died, I was able to re-install macOS onto the spinning drive, but now this machine has been relegated to being a test machine.
The reason I chose to get the M2 Max was two-fold. First, was because I wanted a processor that would last for quite a while, and I think the M2 Max will last longer than the M2 Pro. Secondly, I did want to be able to do a comparison between the M1 Max and the M2 Max.
The two processors do have some differences, including being generationally different. The M1 Max in my Mac Studio is an M1 with a 10-core CPU and 24-Core GPU. The M2 Max in my MacBook Pro is the 12-Core CPU and 30-Core GPU model. Each Apple Silicon processor consists of two different types of processing cores, efficiency cores and performance cores. For the M1 Max there are 8 performance cores and 2 efficiency cores. Comparatively, the M2 Max has 8 performance cores and 4 efficiency cores.
All other specifications are approximately the same. Each has 400 Megabytes per second of memory bandwidth, there are 16-core Neural engines, two hardware video encode engines, and two ProRes encode and decode engines.
As outlined, the differences between these two are slight. If you are going to increase core count in a processor, increasing the efficiency cores make sense, particularly if it is going to be used in a laptop, since you can then shuffle more processes to the efficiency cores, thereby improving battery life. Now, let us look at how the M1 Max and M2 Max do when it comes to building a project.
Building a project
I thought about a good way for me to be able to benchmark the differences between the two machines. I figured building an Xcode application would be a good test. For these tests I did a xcodebuild clean and xcodebuild on both projects for each round of testing. I also made sure the copies of the apps were on the local storage so they would have the fastest possible build times. I ran both sets of tests on both the M1 Max Mac Studio and M2 Max MacBook Pro.
I started out by building my app, wwriteLite first. wwriteLite is a mix of Swift, Objective-C (very little), Storyboards, and SwiftUI. It is a pretty complex app that does include two extensions on it. Here are the results:
| wwriteLite | M1 Mac Studio | M2 MacBook Pro |
|---|---|---|
| Build 1 | 20.51 seconds | 18.45 seconds |
| Build 2 | 20.54 seconds | 17.54 seconds |
| Build 3 | 19.85 seconds | 17.55 seconds |
| Average | 20.30 seconds | 17.84 seconds |
The average build time on the M2 MacBook Pro is 13.7% faster than on the M1 Max Mac Studio.
For additional comparison I opted to do the same test with my other app, "4077: An Unofficial MASH Trivia app". This app is strictly Swift and SwiftUI. It is a bit simpler and therefore should build a bit faster.
| MASH Trivia | M1 Mac Studio | M2 MacBook Pro |
|---|---|---|
| Build 1 | 9.66 seconds | 7.98 seconds |
| Build 2 | 9.01 seconds | 7.84 seconds |
| Build 3 | 9.30 seconds | 7.88 seconds |
| Average | 9.32 seconds | 7.90 seconds |
For the MASH Trivia app, the M2 MacBook Pro is about 17.97% faster. This is closer to Apple's statement that the M2 is 25% faster with Xcode Builds. Even so, at nearly 18% faster builds can save a significant amount of time for those who need to do complex builds. If a build normally takes 30 minutes, an 18% increase would bring that down to about 25 minutes. That can add up over time. Now, let us turn to some other benchmarks.
Benchmarks
With each review of an iPad, iPhone, and Mac I like to include some benchmarks. The benchmarks of the early 2015 13-inch MacBook Pro, when compared to the M2 MacBook Pro are laughable, as one might expect. Here is a table with a comparison of a variety of Apple Silicon and Intel machines. As is the case with all of the benchmarks, these benchmarks were done using GeekBench 5.
| Machine | Single-Core | Multi-Core | Metal | Open CL |
|---|---|---|---|---|
| 14-inch M2 Max MacBook Pro (2023) | 1964 | 15295 | 74429 | 64782 |
| M1 Max Mac Studio (2022) | 1786 | 12768 | 59846 | 48784 |
| 16-inch MacBook Pro (2019) | 1079 | 5395 | 23226 | 26108 |
| M1 Mac mini (2020) | 1762 | 7793 | 21772 | 19847 |
| 12.9-inch iPad Pro 5td Gen witd M1 (2021) | 1712 | 7309 | 20972 | N/A |
| 27-inch iMac (Mid 2017) | 1148 | 4356 | 43935 | 38695 |
| 13-inch MacBook Pro (Early 2015) | 748 | 1709 | 5435 | 3855 |
Should you upgrade?
A question that one must ask themselves each time a new Mac comes out is whether or not they should upgrade. If you have an M1 MacBook Pro, there is no reason to upgrade. The improvements that you will see are, according to Apple, at most 25%. I did not see that type of improvement between the M1 Max and M2 Max, but almost 18% is not bad.
However, If you have any Intel machine, even a 16-inch MacBook Pro from 2019, it may be worth upgrading, if it is within your budget to do so. Single Core performance is up to 80% faster, and multi-core performance is up to 280% faster. If, like me, you are still using a MacBook Pro from 2015, then you should absolutely, without a doubt, upgrade. You will notice the difference right away. The experience will be seamless, for the most part.
You will notice differences, like the backlight keyboard, the notch, the USB-C only ports instead of USB-A, and as well as the fact that you will be required to use macOS Ventura. But other than that you will gain Touch ID support on the laptop.
Closing Thoughts
Overall, particularly for me, the 14-inch M2 Max MacBook Pro has been a great upgrade over my early 2015 13-inch Core i5 MacBook Pro. I do not regret upgrading from my 2015 MacBook Pro because this MacBook Pro is very much like that one, only with USB-C/Thunderbolt 4 instead of USB-A ports.
For me it was not that my early 2015 MacBook Pro was not still functional, it was. It was probably working a bit better since I replaced the battery a couple of years ago. As a matter of fact I still used it for a number of things, but nothing super intensive. As an example, I never opted to generate and build my re-worked website on that laptop because it would probably take 10 or 15 minutes to finish. Given that the laptop was inching closer to 8 years, it was just time for me to upgrade.
Besides needing, and fortuitously, replacing my iMac, waiting this long to replace my MacBook Pro allowed me to bypass the entire butterfly keyboard era. Beyond this, waiting until the Apple Silicon era allowed me to get some significant upgrades, not only in processor and the speed that comes with Apple Silicon, but in the form factor with the more squared-off case, the addition of True Tone, and ProMotion on the display.
Furthermore, I get to keep using the MagSafe 3, like I did with my previous MacBook Pro, and 2007 MacBook before that. The upgraded screen with a larger screen in the same physical size due to reduced bezels is great. Even though there his a notch, I hardly notice it at this point, this is probably because I have become accustomed to the notch on the iPhones, and that the notch does not get in the way since apps can automatically move items around the notch.
If you have an Intel-based Machine, particularly if it is from 2017 or earlier, you should give serious consideration to upgrading to an M2 MacBook Pro. You will not regent doing so. Apple Silicon is worth the upgrade on its own, but the enhancements to the display, keyboard, and the physical keys all add even more nice touches to the computer.
